|
"If you do the body work as you go and not all
at once, it isn't so bad"
Yep, that pretty much sez it!
- A few nifty tricks still might save you a
few hours, though.
I happen to be a fibreglass boat builder, and a
damn lazy one too......... Fibreglass boat building requires a lot of very big
molds that require a perfect high gloss finish, since every print you make from
these molds will be an excact mirror of the mold
itself.
Having spent a considerable part of my miserable
life in dustclouds with sore arms and bleeding fingertips from sanding
(Medícal term: Sanditis), I seem to have finally figured out how
to achieve the best finish with the least amount of effort
involved.
Most importantly, do it as you go !!!
If you don´t, you´ll be sorry.
If you have a small workshop you´ll be forced to
anyway, you just can´t work on all parts of the airframe simultanously. Finish
one or a few parts at a time as available space allows, and finish these
parts completely, so you can stow them away and basically forget about
them until it is time to paint. Nothing is more discouraging than thinking you
are ready to paint and then discover, that you have left prep-work here and
there. All the small "do it later" jobs will suddenly amount to a LOT of
work and, worst of all, you will have forgotten excactly what you postponed, so
you have to go over everything once again.
I know it is tempting to move along with the
construction of the airframe since this will make your project become
an aircraft a lot sooner. It won´t !
Filling is way
funnier than sanding. It´s an
indisputable fact.
So, when you apply
micro, shape it in the spreading phase, not in the sanding phase. Select your
spreaders carefully and always use the widest spreader possible. Bend it, twist
it or, if you work on a complex shape, modify it or even make a spreader as
a template. In the first stages, sand nothing (almost) by hand. Use the good ol´
D/A sander to shape things roughly. Don´t be afraid to sand a little too deep,
but not into the prepreg, you will get right back there with another coat of
micro.
When the surface is roughly there, it is time
to start hand sanding. The trusty 16" sanding board is your best friend here. I
use a 3M sanding board with special self-adhesive sand paper. 60 grit is good at
this stage. Run the surface over criss-cross-wise and you have a good view of
the low´s and high´s. Sand until most of the high spots are gone and go over the
whole surface again, still using the widest spreader possible. I use a 15"
spreader on large surfaces, and it works good for me.
Come back with the sanding board, still using 60
grit. The surface should look pretty ok. by now. So, using any ol´ spray
color, coat the surface with just a thin mist of color. Come back with the
sanding board, 100 grit, just a quick hit, and the quality of your work will
show.
If you are happy by now, you can apply primer and
get depressed because this is where all the pinholes show. Unless you do it
right.....
I use "UV Smooth Prime" manufactured by Polyfiber
and I am extremely happy about it. The primer fills really well, dries quickly
and sands easily. The first coat of primer is the most important, this is where
you have to fill the pinholes.
I apply the first coat with a roller and either
slide the roller side to side or use a plastic spreader to force primer into the
pinholes.I roll the surface over immediately after, in order to achieve a fairly
nice surface.
Shortly thereafter, maybe half an hour or so, I
spray on a good build-up of primer. The sprayed coat evens out the
roller-pattern nicely. Do not spray the very first coat of primer, it will just
bridge over the pinholes and make you dangle from a rope at the end of the day.
I like to wait a couple of days before I sand the primer. As I sand the
primer, still using 100 grit, I usually find a spot or two that could do with a
slight fill. There are no pinholes left.
At this stage polyester putty is allowed, it
adheres very well to primer (as opposed to prepreg!) and I´ll sand off 98% of it
again. I reckon that I´ll have maybe 2 ounces of putty on my plane once I am
done.
I now have a basically nice surface with some ugly
100 grit scratches in it. Machine sanding is out of the question by now and
since, as previously mentioned, I don´t like sanding by hand, I am not going to
attempt to sand these scratches away at all.
I plan on having the paint shot by a professional.
I have spray painted a couple of cars and motorcycles myself and although
things have usually come out ok., I have not for one second considered spraying
this aircraft myself. If I do all the prep work myself, the
paintshop will have to do absolutely nothing but masking and painting. This
is not the expensive and labor intensive part of a paint job!
So I payed the paintshop a visit early on in the
process, picked the colors and paint system that I liked and brought home
about a gallon of sprayfiller for this paint system. I
love sprayfiller! I had the painter dye the filler, so it stands out from the
white primer.
Now I pick up the spraygun and, after wiping
off dust and finger-grease (from the aircraft too!), apply a THIN coat of well
thinned sprayfiller. This will fill all those pesky 100 grit scratches.
After a day or two, it is time to wet-sand the
lot. This is only about 20% as bad as it sounds. The 320 grit cuts the
sprayfiller extremely fast, I just use plenty of water to wash away
the loose "mud". At this stage I use a soft sanding block, typically a hand-size
piece of plywood with a piece of 1/2" foam glued to it. Seat foam works fine.
The foam distributes pressure and releases water in a suitable manner.
If I find a pinhole, polyester putty is still
allowed. I wet-sand in circular motion, so the edges of the
sandpaper do not create grooves in the sprayfiller. I sand the parts in a
systematic manner, from one end to the other, in one foot increments or
so.
Whenever I think I am done with a one foot section,
I rinse off the dust with plenty amounts of clean water and give it a blow of
compressed air. Any tiny depression will show up darker than the surrounding
area. Fill with putty or, if there is still a reasonable layer of filler left,
sand the whole area more.
That´s it! Wipe off, leave to dry completely, wrap
in plastic and stow the part away. Your painter is gonna love you, I actually
saw mine leave my workshop whisteling and rubbing his hands, obviously knowing
that this would be the easiest money he is ever going to earn.
DAMN!!
I have attached a few photos. As you see, the belly
was done while the airframe was still inverted. I absolute cherish myself for
having done this back then. It´s done, finito, I do not have to fill, sand and
what have we all lying on my back!!! Good guy, love ya´, go ahead and grab a
beer..............
Another photo shows a completely finished wing
hanging on the wall. Love ya´ even more, have another
beer...............
Finally I have attached a close-up of the wing.
What might look like strokes from a paint brush is actually 100 grit scratches
nicely filled with sprayfiller. The yellow spots are, you guessed it,
putty.
So, when out of the paintshop, all I have to
do is wetsand everything with 1500 grit and buff, buff, buff, wax, wax, wax
and GO FAST! Watch out, Hairy Lenny
!
I don´t count money, nor do I count hours spent on
this project, but I am afraid it is not possible to produce a fair paint job in
less than 500 hrs. This probably translates to 700 hrs. for LIV / ES,
sorry................
Regards
Tim Jorgensen
360MKIIOBFB, 65% realistically done
No, not a secret military experiment, this is what
it is supposed to look like!
DONE!!! Absolutely finished! I deserve beer! Yes
Chris, I know I am not done with the cowling..................
If I´d had a female painter, this would have made
her do things to me....................
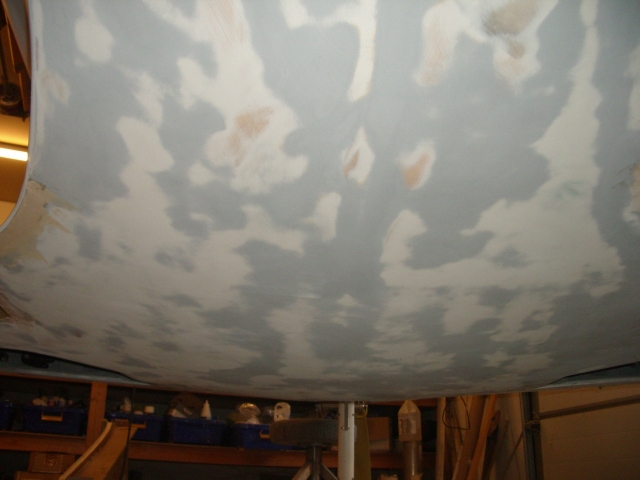
Belly.jpg
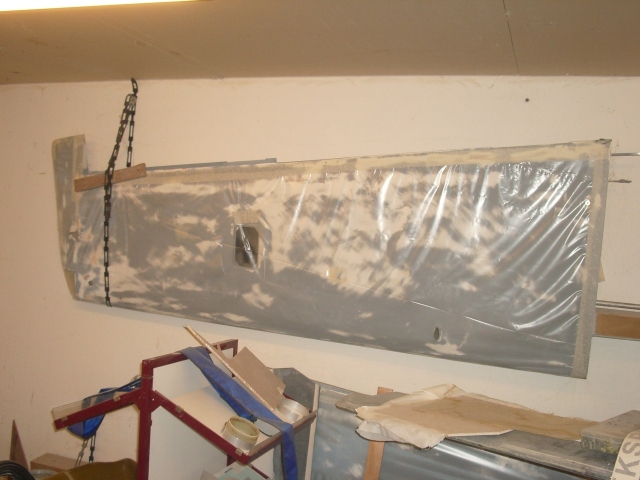
Wing.jpg
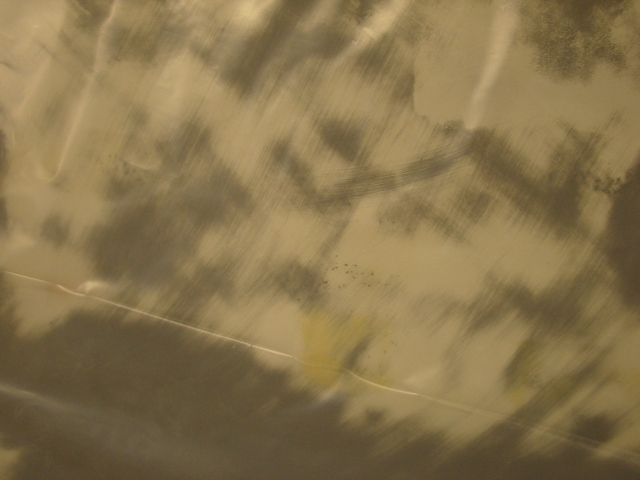
Close_up.jpg
|