(Message 1 of 2)
Others will have more experience/insight, but I am also priming the
belly (of an ES). Photo attached.
I thought my bottom was reasonably flat to begin with (especially being
it was only the bottom). I even checked it at night with a light. Thus,
in addition to all the seams and fairing, I only micro'd several low spot
"areas" as body work prep before the primer. However, in
retrospect it was not enough. When I started sanding the primer with a
long board, I quickly found other "high" areas that I had not previously
addressed. The following link explains an approach for finishing which
addresses this phenomenon pretty well.
http://curedcomposites.netfirms.com/finish.html
As recommended in the article, I probably should have micro'd the
entire bottom - at least with a thin skim coat and then removed all that wasn't
needed with a long board.
I ended-up needing to work a few trouble areas with a couple build coats
of primer which is heavier, takes 24hrs to cure, and is much harder to sand.
I did some weight testing by curing two samples of micro and primer in
a paper cup and weighing them on a gram scale. After they cured up, I
filler the remaining portions of the cups with water to accurately measure the
volume of the primer and micro. I then calculated the density. It
seems that primer is about 50%-100% heavier than micro depending on how dry you
can get the micro and still work with it.
Thus, I probably have an extra lb or two on my bottom and spent approx
3-5 days more time than would have been necessary.
I am just now getting ready to spray what should be the final coat. I've
added a 2nd_to_last_coat that was reasonably thick which I have sanded smooth
with 180 grit. I'm planning on adding a final very thin coat and leaving
it shiny for now.
Later, during the paint prep process, I'm anticipating all of this
final very thin shiny coat will be removed.
As everyone on this list (with more experience) can probably attest to,
having the right sanding tools is critical.
I have found the following source to be good for sanding
supplies http://www.eastwoodco.com/index.jsp
Competitive pricing, good service, next day shipping, etc.
I made my own long boards (large rigid sanding boards) from
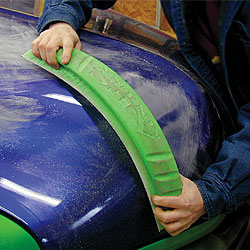
Oak (one in the attached photo). However, Eastwood sells a great flexible
sander (pictured below). It has a thin metal face to keep the paper flat
and three (removable) metal rods that slide into it to vary the
stiffness. Great for curved surfaces (fairings, etc). It is a bit
pricy @ $70.00 – but I haven’t seen another as good. If I
were to have only one sander, this would be it. They also sell a short 6”
one which is handy for smaller areas.
http://www.eastwoodco.com/jump.jsp?itemID=1693&itemType=PRODUCT

Good sand paper can become expensive. But, the really
cheep stuff will cost you more ;-)
You might be surprised how much better good paper works and
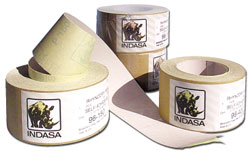
lasts (i.e. not all 80 grit is created equal). I’ve had good luck
with the Indasa PSA (pressure sensitive adhesive) backed stuff also from
Eastwood.
I primarily use 80, 120, and 180 Grit. Unfortunately,
they don’t sell Indasa 180 grit PSA. So, for 180 grit, I use 3M
from a local auto painters supply shop.
http://www.eastwoodco.com/shopping/product/detailmain.jsp?itemID=11025&itemType=PRODUCT&iMainCat=1217&iSubCat=1225&iProductID=11025

Power Sanding…
I do most finesse and primer sanding by hand. However,
when I have to clean-up and/or rough-up a fiberglass surface for bonding or
prep, etc I use a power sander.
I have several pneumatic DA/orbital palm type sanders.
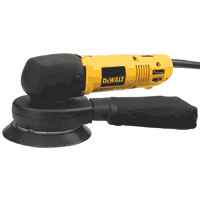
However, my father loaded me his DeWalt heavy duty orbital sander like pictured
below. It seems to work much better than my air sanders. Perhaps my
air pressure (~90psi) is too low. I almost always use it on the lower
power settings, as the High power settings are just “too good” for
an amateur like me. I assume it also uses less power than the air
compressor, which otherwise seems to run more than 50% of the time with my
6” palm sanders.
Heavy-Duty 6" Right Angle Random Orbit
Sander with Electronic Variable Speed - DW443

Open to all suggestions/comments from others who’ve
been down this road.
Rick Titsworth, Detroit