|
Bill,
I measured outboard from the BL25.5 inboard edge of the wing and placed masking tape on each wing at 1 foot intervals. I knew it was important that I was measuring both wings at the exact same points. I leveled the fuselage and wings. I ended up only checking every 3 feet because it was a pain to adjust the jig. It still gave me 6 measurements.
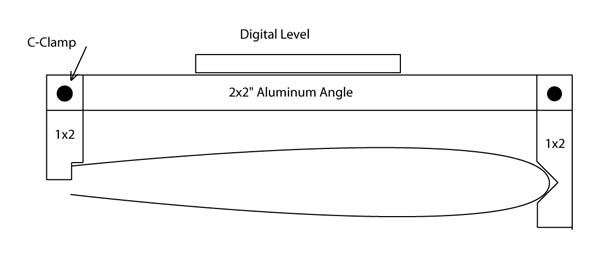
I took a 1x2 board and put a "V" into it so it would center on the leading edges. I cut a notch in another 1x2 so it would rest on the top of the trailing edges. I used an 2x2" aluminum angle bar running horizontally between the two 1x2's. I used C-clamps to hold the whole thing together. I taped a 12" level to one of the 1x2's to make sure I was holding the jig vertical. I adjusted the length of the jig to fit the chord of the wing and leveled the aluminum angle close to zero on my digital level. It would have been a lot easier with two people!
I measured one side and then the other, back and forth a couple times to make sure nothing slipped. The numbers were very consistent, within 1/10th degree each time I measured at a certain place. Since the jig was set to a certain chord, I measured left to right, recorded the difference between each wing, and then adjusted the jig for the next wing position. The number that I started with on the level wasn't important, just the difference left to right. So if I had 1.8 degrees on the left and 2.1 degrees on the right, I recorded .3 as the difference in incidence.
By adjusting the chord of the jig, you can measure to the trailing edge of the top skin, or the trailing edge of the flap, or whatever point you want to check.
See attached drawing.
Mike Easley
Colorado Springs

Incidence Measuring Setup.jpg
|