Hi Finn/Group:
Sorry, my reference to bolt location was wrong – looked at the diagram off by 90 degrees … the broken bolt is actually either #5, #9
or #13 in the torque-sequence.
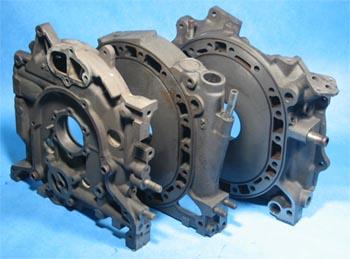
I guess the bolt isn’t directly exposed to oil flow, but it is adjacent to the oil return port/internal oil gallery to the stock oil filter pedestal … see attached picture.
Wouldn’t a loose tension
bolt in this area be a concern for both oil and coolant, getting around the outer O-ring?
We put those rubber sealing washers on each bolt head for some reason …
Jeff
Hi Jeff,
I've done that too.
Wrapped the long drill bit in something to keep it centered. (Probably used layers of heat shrink.)
Brazed an easy-out to a piece of 1/4" (?) steel tube.
As far as I know, none of the tension bolt holes are exposed to oil flow. Not sure that that particular bolt passes through any cavities directly exposed to coolant either. In any case, I don't see that any small steel shavings would adversely affect the cooling
system. Antifreeze should prevent any electrolytic reaction between steel and aluminum if a bit of steel shaving should become lodged in a radiator, right? Or you could disconnect the radiators and flush the cooling channels in the engine block. But first
look at where that particular bolt passes through. Might not be a problem at all.
Finn
On 1/4/2011 9:03 AM, Jeff Whaley wrote:
Yesterday, while checking over my engine for the source of a nagging oil leak I found a broken tension bolt,
I guess it’s good in respect to finding the problem but WTF?
During installation I applied a spiral of silicone around each bolt trying to prevent this from happening. The
broken bolt is positioned in the upper left hand corner (if viewed from prop end) and according to my Haynes Manual it is either #8 or #12 in the torque-sequence.
Checking Tracy’s website I read about his SQUAWK with same issue many years ago … he was able to get the bolt’s
threaded portion out without having to tear-down the engine or resort to the drill and easy-out method.
What happens to those metal shavings inside there if I have to drill and use an easy-out?
Can I extract them all with a magnet or compressed air?
Am I looking at an engine tear-down … or replace the bolt (or bolts), re-torque the stack and carry on?
Jeff
__________ Information from ESET NOD32 Antivirus, version of virus signature database 5759 (20110104) __________
The message was checked by ESET NOD32 Antivirus.
http://www.eset.com
This message, and the documents attached hereto, is intended only for the addressee and may contain privileged or confidential information. Any unauthorized disclosure is strictly
prohibited. If you have received this message in error, please notify us immediately so that we may correct our internal records. Please then delete the original message. Thank you.
__________ Information from ESET NOD32 Antivirus, version of virus signature database 5759 (20110104) __________
The message was checked by ESET NOD32 Antivirus.
http://www.eset.com